Binoculars for Bird Watching: Beginner Buying Guide
Best Binoculars for Beginner Bird Watchers: A Guide to Choosing Wisely the First Time
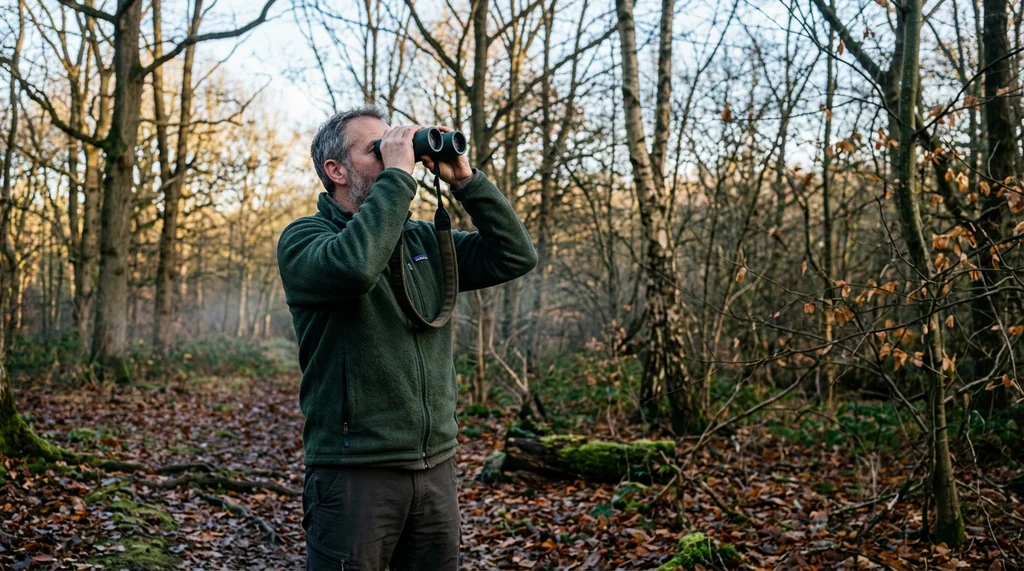
The first pair of binoculars I bought for bird watching cost $180 and weighed 47 ounces. They had 12mm of eye relief, couldn't focus on anything closer than 20 feet, and within six months had become genuinely unusable. Three years later, I've landed on a pair I use every single day, and I've learned enough along the way to save you from making the same expensive detour I did.
Choosing binoculars for bird watching is one of those decisions that looks simple from the outside — you're buying something to make things look bigger — but turns out to have about fourteen variables that actually matter. Magnification, objective lens diameter, eye relief, close focus distance, prism type, coating quality, field of view, weight. Miss one of these and you end up with a pair that technically functions but fails you at the exact moment you need it most: a warbler in the shrubs ten feet away, a hawk circling overhead, a cardinal pair you've been watching for three years suddenly doing something interesting.
This guide covers what beginners actually need to know, the specifications that matter and why, and specific recommendations across a range of budgets. No jargon for its own sake. No recommendation that ignores real-world conditions.
Key Takeaways
- 8x42 binoculars with a 380-foot-plus field of view at 1,000 yards make it significantly easier to locate moving birds than 10x configurations.
- Glasses wearers must choose binoculars with 18mm or more eye relief or they will see only a partial, dark-edged image.
- A close focus distance of 8 feet or less is required for backyard feeders where birds approach within 10 feet.
- Fully multi-coated lenses are achievable at the $150-200 price point and deliver noticeably brighter, sharper images than cheaper coatings.
- Set the diopter adjustment on your right eyepiece once to match your eyes, then use only the central focus wheel for all subsequent focusing.
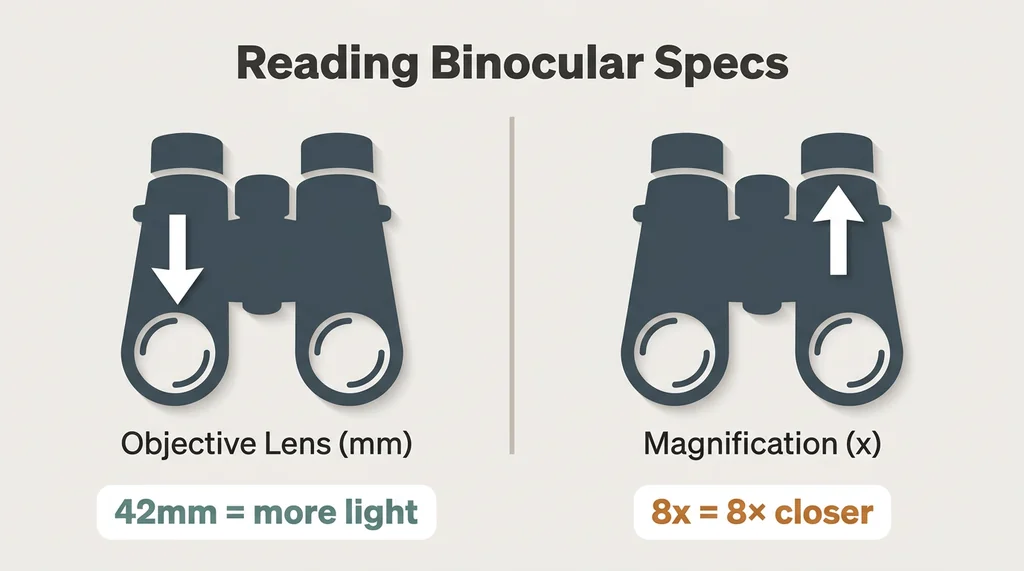
What the Numbers on Binoculars Actually Mean
Every pair of binoculars has two numbers stamped on them: something like 8x42 or 10x50 or 8x32. The first number is magnification. The second is the diameter of the objective lens — the big lens at the far end — measured in millimeters. These two numbers determine more about your experience than anything else.
Magnification controls how much larger the image appears compared to the naked eye. 8x means the bird looks eight times closer. 10x means ten times closer. This sounds like more is better, but it's not that simple. Higher magnification amplifies hand tremor, narrows your field of view, and makes it harder to locate a bird quickly. For most beginners watching birds at a feeder or in a woodland setting, 8x is significantly more useful than 10x.
Objective lens diameter controls how much light enters the binoculars. A 42mm objective lens gathers more light than a 32mm lens, which matters in low-light conditions — dawn, dusk, overcast days, deep forest. The tradeoff is weight and bulk. A 42mm lens requires a larger, heavier body than a 32mm lens.
The ratio between these two numbers — objective diameter divided by magnification — gives you the exit pupil, which tells you how bright the image will appear. 8x42 binoculars have an exit pupil of 5.25mm. 10x50 binoculars have an exit pupil of 5mm. Human pupils in daylight dilate to roughly 3-4mm, so anything above 4mm is more than sufficient for daytime birding. The exit pupil calculation matters more for stargazing than bird watching, but it explains why the 10x50 binoculars I bought first weren't actually delivering the brightness advantage I expected.
Why 8x42 Is the Right Starting Point for Most Beginners
The birding community has effectively converged on 8x42 as the standard recommendation for beginners, and after three years of daily use, I understand why. My current binoculars are 8x42 roof prism with 6.5-foot close focus, 18mm eye relief, and a 420-foot field of view at 1,000 yards. They weigh 24 ounces. I bought them three years ago for $240 and use them every single day.
The 420-foot field of view is the specification that matters most for beginners and doesn't get discussed enough. Field of view determines how wide a swath of the world you can see through the binoculars at any given moment. A wider field of view makes it dramatically easier to locate a bird that's moving — you sweep the binoculars toward the movement and the bird is more likely to appear in your frame. Narrow field of view means more searching, more frustration, more missed looks.
My first binoculars, the 10x50s, had a field of view around 330 feet at 1,000 yards. They also weighed 47 ounces — nearly three pounds — which sounds manageable until you're holding them up for forty minutes watching a woodpecker work through a dead tree. By the time I understood what I was looking at, my arms were shaking.
The case for 8x32: Dr. Patricia Fielding, who has been studying bird physiology for forty years, has used the same 8x32 binoculars for twenty years of field research. She paid $180 for them in 2004 — roughly $280 in today's money. They weigh 18 ounces and travel everywhere with her. The 8x32 configuration is excellent for anyone who prioritizes portability, does most of their birding in good daylight conditions, or simply finds heavier binoculars uncomfortable. The tradeoff is slightly reduced low-light performance compared to 8x42.
The case for 10x42: Some beginners want more magnification for open-country birding — watching shorebirds across a marsh, scanning a meadow for sparrows, observing raptors at distance. 10x42 binoculars deliver that extra reach with a manageable weight penalty. The tradeoff is the narrower field of view and more noticeable hand tremor. If most of your birding will happen at feeders or in woodland settings where birds are within 50 feet, 10x42 is probably more magnification than you need.
Eye Relief: The Specification That Glasses Wearers Cannot Ignore
Eye relief is the distance between the eyepiece and your eye at which you see the full field of view. It's measured in millimeters. For people who don't wear glasses, eye relief of 14mm or more is generally comfortable. For people who wear glasses and cannot remove them to use binoculars, 18mm or more is essential.
My first binoculars had 12mm of eye relief. I don't wear glasses, so this wasn't a functional problem for me, but it limited who could share them. My husband David does wear glasses, and those binoculars were essentially useless for him — he could only see a portion of the field of view, with a dark ring obscuring the edges. David now has his own 8x42s with 18mm eye relief and adjustable twist-up eyecups, and the difference is complete. He sees the full image.
If you wear glasses, do not buy binoculars without checking the eye relief specification. 18mm is the number to look for. Many manufacturers list this specification prominently because they know it matters; if a product listing doesn't include it, that's a reason for caution.
Adjustable eyecups — which twist or fold down to accommodate glasses wearers — are standard on most quality binoculars. The mechanism matters more than you'd expect. Cheap twist-up eyecups strip their threading or fail to hold position within a year of regular use. This is one area where paying more buys genuine durability.
Close Focus Distance: Why This Matters More Than You Think
Close focus distance is the minimum distance at which the binoculars can produce a sharp image. My first binoculars couldn't focus on anything closer than 20 feet. My current ones focus down to 6.5 feet.
This sounds like a minor technical detail until a butterfly lands on a flower three feet from your face, or a wren hops along a branch just inside the window, or a warbler drops into a shrub between you and the feeder. Bird watching at a feeder involves a lot of close subjects. The birds you're most excited to see — the ones that let you get genuinely close — are exactly the birds you'll fail to observe clearly if your binoculars can't focus at short range.
For backyard bird watching specifically, a close focus distance of 8 feet or less is worth prioritizing. Many entry-level binoculars have close focus distances of 15-20 feet, which is fine for open-country birding but limiting in garden settings.
Prism Types: Roof Prism vs. Porro Prism
Inside every pair of binoculars are prisms that fold the light path to make the instrument compact enough to hold. There are two main designs: roof prism and porro prism.
Roof prism binoculars have a straight barrel — the objective lenses are aligned directly with the eyepieces. They're compact, sleek, and weather-resistant. Most modern birding binoculars use roof prism designs. They're more expensive to manufacture to the same optical quality as porro prisms.
Porro prism binoculars have the characteristic offset barrel design — the objective lenses are wider apart than the eyepieces. They're bulkier but can deliver excellent optical quality at lower price points because the prism design is less demanding to manufacture. Tom at the hardware store — who has let me borrow binoculars to test at home more times than I can count — uses porro prism binoculars himself, and the image quality through them is genuinely impressive for what they cost.
For beginners buying their first pair, roof prism binoculars at the $150-300 price point are generally the better choice for durability and weather resistance. But if budget is the primary constraint, a quality porro prism binocular at $80-120 can outperform a cheap roof prism at the same price.
Lens Coatings: What the Labels Mean
Binocular manufacturers describe their lens coatings with terms that range from meaningful to nearly meaningless. Here's a quick translation:
- Coated: A single layer of coating on some lens surfaces. Entry-level.
- Fully coated: A single layer on all lens surfaces. Better.
- Multi-coated: Multiple layers on some surfaces. Good.
- Fully multi-coated: Multiple layers on all lens surfaces. This is what you want.
Fully multi-coated lenses transmit more light, reduce glare, and produce brighter, sharper images than cheaper coating options. My current binoculars are fully multi-coated, and the difference in image quality compared to my first pair was immediately obvious. Colors are more accurate. The image is brighter in low light. Edge sharpness is better.
At the $150-200 price point, fully multi-coated optics are achievable. Below $100, you're more likely to get multi-coated or simply coated lenses, which is fine for casual use but will limit performance in difficult light conditions.
Budget Categories: What to Expect at Each Price Point
Under $100: Functional for casual observation. Expect limited coatings, heavier weight, less precise focusing mechanisms, and potentially disappointing low-light performance. Porro prism designs offer better value in this range than roof prisms. These binoculars are fine for a child who might be interested in birding, or for someone genuinely uncertain whether they'll pursue the hobby. They are not fine for someone already committed to learning birds seriously.
$150-200: This is where genuinely useful birding binoculars begin. Fully multi-coated optics become achievable. Build quality improves substantially. Close focus distances get shorter. Several well-regarded brands offer 8x42 configurations in this range that will serve a beginner well for years. Genuinely useful binoculars start around $150 to $200; spending less typically means compromising optical quality in ways you'll notice.
$200-350: The sweet spot for most beginners who are serious about the hobby. My current binoculars sit in this range at $240. At this price point, you get fully multi-coated optics, solid weather resistance, comfortable ergonomics, reliable focusing mechanisms, and optical quality that will satisfy most users for years. This is where I'd direct anyone who asks me what to buy.
$350-600: Mid-range glass that professional guides and serious hobbyists use. Optical quality improves noticeably — better edge-to-edge sharpness, superior low-light performance, more accurate color rendition. If you already know you'll be birding seriously for years, this range is worth considering. If you're just starting out, the $200-350 range is more appropriate.
Above $600: Premium and professional optics. Dr. Patricia Fielding's field research uses equipment in this range when she's not using her beloved 8x32s. The optical quality is extraordinary. The price is also extraordinary. This is not where beginners should start.
Specific Specifications to Prioritize When Shopping
Rather than recommending specific models — which change availability and pricing regularly — here's the specification checklist that should guide any beginner's purchase:
Non-negotiable:
- 8x42 configuration (or 8x32 for portability, 10x42 for open-country birding)
- Fully multi-coated lenses
- Close focus distance of 10 feet or less (6-8 feet preferred)
- Eye relief of 14mm minimum; 18mm if you wear glasses
- Field of view of at least 380 feet at 1,000 yards (wider is better)
Strongly recommended:
- Weight under 30 ounces
- Waterproof construction (nitrogen or argon purged)
- Twist-up eyecups with multiple detent positions
- Roof prism design for durability
Worth considering but not essential for beginners:
- Phase-corrected prisms (improves contrast and resolution; standard on better roof prism binoculars)
- ED (extra-low dispersion) glass (reduces chromatic aberration; noticeable improvement in quality)
The Accessories That Actually Matter
Neck strap: Every pair of binoculars comes with one, and most of them are uncomfortable after thirty minutes. A wider, padded strap distributes weight better and makes extended observation sessions significantly more comfortable. A quality replacement strap costs $15-30 and is worth it immediately.
Lens caps: Objective lens caps are more useful than they sound. Dust and moisture on the objective lenses affect image quality. Keep the caps on when the binoculars aren't in use. Eyepiece caps are less critical — they slow down deployment — but protect against dust during storage.
Cleaning supplies: A microfiber lens cloth and a blower brush are essential. Never use regular paper towels or clothing to clean binocular lenses; the abrasion damages coatings over time. A lens cleaning kit costs under $15 and extends the life of expensive optics substantially.
Tripod adapter: For extended observation sessions — watching a nest, monitoring a feeder from a distance, scanning a marsh — a tripod adapter lets you mount binoculars on a standard camera tripod. I keep a $25 tabletop tripod by the kitchen window for extended cardinal observation sessions. The stability eliminates fatigue entirely and makes it possible to observe for an hour without discomfort. Most binoculars have a threaded socket on the front that accepts a standard adapter.
A field guide: No binoculars will help you identify what you're seeing if you don't have a reference. A regional field guide to birds costs under $25 and is as important as the binoculars themselves. Digital apps have improved enormously and are useful, but a physical field guide doesn't require a signal, doesn't drain a battery, and can be marked up with your own observations.
The Honest Advice About Buying Used
The used binocular market is worth considering for beginners, with caveats. Quality binoculars from reputable manufacturers last decades with proper care. Buying a used pair of 8x42s from a trusted brand at half the new price is often genuinely smart.
The risks: prism misalignment (which causes eye strain and double images), damaged coatings (which reduce optical quality in ways that aren't immediately obvious), and focusing mechanisms that have loosened with age. Before buying used, check alignment by looking at a distant straight line — a roofline or telephone wire — and confirming the image from both barrels merges cleanly. Check for any double image or vertical offset. Inspect the objective lenses in good light for scratches, fungus (a hazard in humid storage conditions), or coating damage.
Buying used from a camera shop with a return policy is safer than buying from an individual seller with no recourse.
A Note on Patience With the Learning Curve
New binoculars take time to use well. The coordination required to raise binoculars to your eyes and immediately find a moving bird — rather than sweeping around looking for it — develops over weeks of practice. The technique is to fix your gaze on the bird first, then raise the binoculars to your eyes while keeping your gaze fixed. It feels awkward at first. After a month of regular use, it becomes automatic.
The same applies to focus. The central focus wheel adjusts both barrels simultaneously; the diopter adjustment (usually on the right eyepiece) compensates for differences between your two eyes. Set the diopter correctly once, and the central focus wheel does all the work from then on. Most beginners skip the diopter setup and wonder why one eye always seems slightly out of focus.
The right pair of binoculars doesn't make you a better birder immediately, but it removes the friction that would otherwise slow you down. You stop fighting your equipment and start watching the birds. That shift — from frustration to absorption — is when the hobby actually takes hold.
Spend $150-350 on a pair with the specifications outlined above. Adjust the diopter properly on the first day. Practice finding birds before you worry about identifying them. The identification comes with time; the habit of looking closely starts with having the right tool in your hands.